Battery switch on travel trailer function is crucial for managing your RV’s power. This guide dives into the hows and whys of these switches, covering different types, safe operation, troubleshooting, and integration with your trailer’s electrical system. We’ll explore everything from connecting your house battery to preventing parasitic drain, ensuring you’re equipped to handle any power situation on the road.
Understanding your travel trailer’s battery switch is key to a smooth and enjoyable camping experience. Whether you’re a seasoned RVer or a newbie, this guide will empower you to confidently manage your trailer’s power, troubleshoot issues, and extend the life of your batteries. We’ll break down the complexities of different switch types, safety procedures, and common problems, providing clear, step-by-step instructions and helpful tips along the way.
Understanding Battery Switch Functionality in Travel Trailers
A battery switch is a crucial component in a travel trailer’s electrical system, allowing you to manage the power flow between your trailer’s batteries and the various appliances and systems. Understanding its operation is essential for safe and efficient use of your RV. Properly using the switch protects your batteries and prevents accidental drain.
Battery Switch Purposes
The primary purpose of a battery switch is to isolate or connect your trailer’s batteries to the electrical system. This control is vital for several reasons: It prevents accidental discharge of your house batteries when the trailer is not in use, allowing you to store your RV for extended periods without worrying about a dead battery. It also allows you to selectively charge batteries (like using a generator to charge only one battery bank), or to switch between different power sources (shore power, generator, solar).
Finally, it can help protect sensitive electronics from voltage surges or shorts.
Types of Battery Switches
Several types of battery switches are commonly used in travel trailers. The most prevalent are the 1-2-Both switches and the 1-2-Off switches. A 1-2-Both switch allows you to select either battery 1, battery 2, or both batteries to power your trailer’s systems. A 1-2-Off switch offers the same battery selection options, but also includes an “Off” position to completely disconnect both batteries from the system.
There are also more complex switches, managing multiple battery banks or incorporating additional features like battery monitoring.
Operating a Typical Battery Switch
Operating a battery switch is usually straightforward. First, locate the battery switch, often found near the batteries themselves or in a convenient access panel. Next, identify the switch positions (1, 2, Both, Off). Before making any changes, turn off all appliances and devices running on the battery power. Then, carefully rotate the switch to the desired position.
For example, to use only battery 1, select position “1.” To charge both batteries simultaneously from shore power, select “Both.” Finally, after selecting the desired position, turn on any appliances you want to use. Remember to always return the switch to the “Off” position when the trailer is stored for an extended period to prevent battery drain.
Comparison of Battery Switch Types
| Feature | 1-2-Both Switch | 1-2-Off Switch | Other Multi-Bank Switches |
|---|---|---|---|
| Number of Battery Banks Controlled | Two | Two | Two or More |
| Off Position | No | Yes | Yes |
| Advantages | Simple to operate, cost-effective | Prevents battery drain, added safety | Greater flexibility, advanced features (e.g., monitoring) |
| Disadvantages | Potential for battery drain if left in the wrong position | Slightly more complex, potentially higher cost | Higher cost, more complex operation |
Connecting and Disconnecting Batteries: Battery Switch On Travel Trailer Function
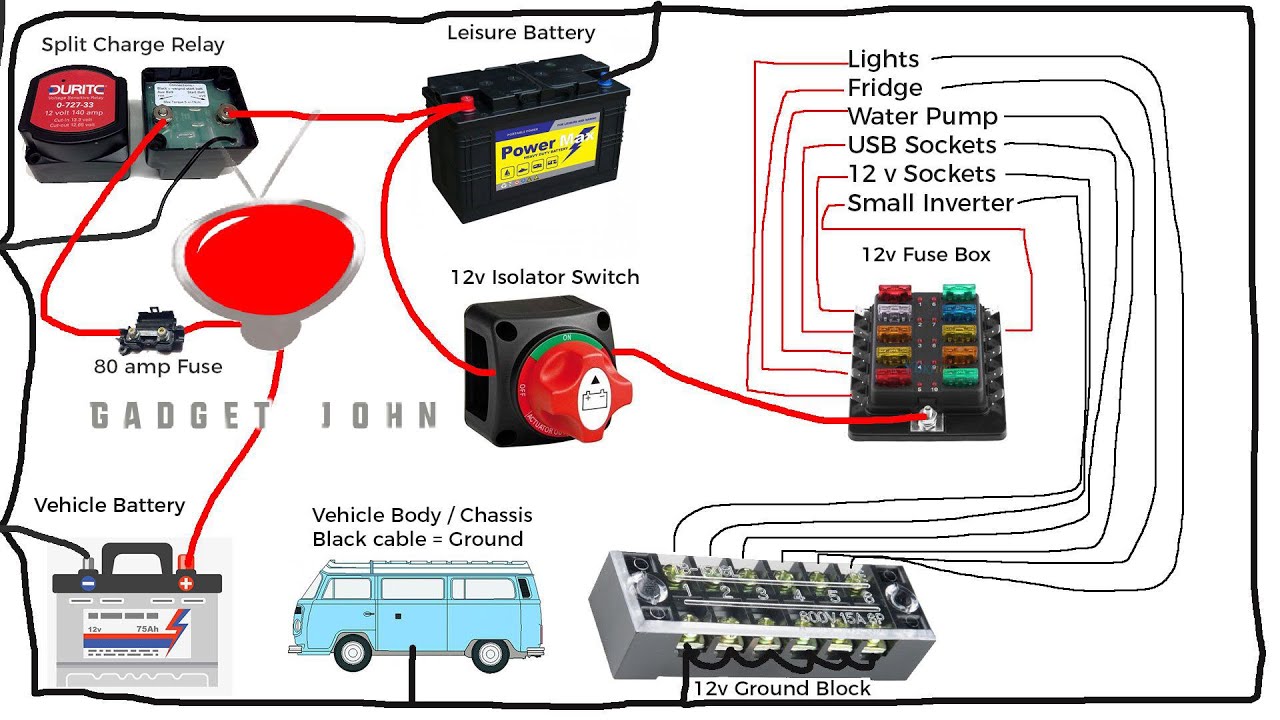
Connecting and disconnecting your travel trailer’s house battery involves straightforward steps, but safety is paramount. Proper procedures ensure the longevity of your battery and prevent potential hazards. Always prioritize safety when working with electrical systems.Connecting the house battery to your vehicle’s charging system allows you to recharge the battery while driving. This is crucial for extended trips and off-grid adventures.
So, you’re an audiophile who loves to travel? Awesome! Check out this guide on audiophile travel setups to make sure your music sounds amazing wherever you go. It’s all about packing smart, and knowing how to get the best sound from your portable gear. Then, if you’re hitting the road in an RV, understanding your battery switch on travel trailer function is crucial to avoid dead batteries and keep the tunes playing.
Seriously, it’s a game-changer for extended trips.
Disconnecting the battery, on the other hand, is important for safety and to prevent unwanted drain when the trailer isn’t in use.
Connecting the House Battery to the Vehicle’s Charging System, Battery switch on travel trailer function
This process typically involves a battery switch and wiring connecting the trailer’s battery to the tow vehicle’s charging system. Locate the battery switch (often near the battery itself) and ensure it’s in the “off” position before proceeding. Then, connect the trailer to the tow vehicle, ensuring the electrical connection is secure. Finally, switch the battery switch to the “on” position, allowing the vehicle’s alternator to charge the trailer’s house battery.
Safety Precautions When Working with Batteries
Working with batteries requires caution. Always wear appropriate safety glasses or eye protection to shield your eyes from potential splashes of battery acid. Acid burns are extremely painful and corrosive. Ensure adequate ventilation as battery fumes can be harmful if inhaled. Never work near open flames or sparks as batteries contain flammable gases.
Also, avoid touching the battery terminals with bare skin.
Maintaining Battery Connections to Prevent Corrosion
Corrosion on battery terminals is a common problem that can hinder the flow of electricity and damage your battery. To prevent this, regularly inspect your battery terminals for corrosion. Use a wire brush or terminal cleaner to remove any corrosion. Apply a battery terminal protector to prevent future corrosion. A thin layer of grease can also help.
Keeping the battery box clean and dry will further reduce the likelihood of corrosion.
Disconnecting the House Battery from the Trailer’s Electrical System
Disconnecting the house battery is equally important for safety and maintenance. Before disconnecting, ensure all electrical devices within the trailer are turned off. Locate the battery switch and turn it to the “off” position. This will cut power to the house battery, preventing accidental short circuits or electrical discharges. You can then disconnect any additional auxiliary connections if necessary, ensuring a safe and complete disconnection.
Troubleshooting Common Battery Switch Issues

Dealing with a malfunctioning battery switch in your travel trailer can be frustrating, but with a systematic approach, you can often pinpoint and resolve the problem. Understanding the common causes of failure and the steps to troubleshoot them will save you time and potential headaches on the road.Troubleshooting a non-functioning battery switch involves checking several key components. The most common issues stem from simple problems like blown fuses or loose connections, but more complex wiring faults are also possible.
So, you’re an audiophile who loves to travel? Awesome! Check out this guide on audiophile travel setups to make sure your listening experience stays top-notch on the road. Knowing how to pack your precious gear is key, but equally important when you’re in an RV or travel trailer is understanding your power. Learning about the battery switch on travel trailer function will save you headaches (and dead batteries!) down the line.
Proper power management is essential for a smooth trip, allowing you to enjoy both your music and the open road.
A methodical approach, starting with the simplest checks, is the most effective strategy.
Blown Fuses and Faulty Wiring
Blown fuses and faulty wiring are frequently the culprits behind a non-functioning battery switch. A blown fuse will interrupt the circuit, preventing power from reaching the house batteries. Faulty wiring, which might include corrosion, loose connections, or damaged wires, can also interrupt the flow of electricity. Inspect all fuses in the battery switch circuit, replacing any blown fuses with fuses of the correct amperage.
Carefully examine all wiring connections for signs of corrosion, looseness, or damage. Tighten any loose connections and repair or replace any damaged wiring. Remember to disconnect the battery before working on any wiring.
Troubleshooting Steps for a Non-Functioning Battery Switch
A logical troubleshooting sequence is crucial. First, verify the switch itself is in the correct position. Next, check the fuses. If the fuses are intact, test the voltage at the battery terminals and at the output of the switch. A lack of voltage at the switch output, with voltage present at the battery terminals, indicates a problem within the switch or wiring.
A multimeter is essential for these voltage checks. If the voltage is present at the output of the switch but not reaching the appliances, the problem likely lies in the wiring downstream from the switch. Finally, inspect the wiring harness for any visible damage or loose connections.
Causes of a Dead House Battery Even with the Switch “On”
Even with the battery switch in the “on” position, a dead house battery can result from several factors. A parasitic draw, where a small amount of current is continuously drawn from the battery even when appliances are off, can slowly drain the battery over time. Faulty appliances or incorrectly installed accessories can create these draws. Another cause is a faulty battery itself, which may have lost its capacity to hold a charge.
A fully charged battery that drains quickly suggests a high parasitic draw or a faulty battery. A simple load test can determine the battery’s health. Finally, a poorly connected or corroded battery terminal can also prevent the battery from charging correctly, even if the switch is on. Regular cleaning and tightening of battery terminals are vital preventative measures.
Troubleshooting Flowchart
Imagine a flowchart. It would begin with a “Start” box. The first decision point would be: “Is the battery switch in the ‘on’ position?” If no, switch it on. If yes, proceed to the next box: “Are the fuses intact?” If no, replace the blown fuse(s). If yes, proceed to the next box: “Is there voltage at the battery terminals?” If no, check battery connections and battery health.
If yes, proceed to the next box: “Is there voltage at the switch output?” If no, check wiring between battery and switch. If yes, proceed to the next box: “Is there voltage at the appliance terminals?” If no, check wiring between switch and appliance. If yes, the problem likely lies within the appliance itself. The flowchart concludes with an “End” box.
This systematic approach allows for a clear and efficient path to identify the source of the problem.
Battery Switch and Deep Cycle Battery Usage
Deep-cycle batteries are the workhorses of any travel trailer’s power system, providing the juice for lights, appliances, and other onboard systems. Understanding how your battery switch interacts with these batteries is crucial for maximizing their lifespan and ensuring reliable power. This section details the importance of deep-cycle batteries, how the battery switch optimizes their use, and tips for extending their life.Deep-cycle batteries are designed for repeated discharging and recharging, unlike starting batteries which deliver a high burst of power for a short time.
In a travel trailer, you’ll likely be using power for extended periods – running lights, a refrigerator, or charging devices – making deep-cycle batteries essential. Starting batteries, on the other hand, are not suitable for this type of sustained discharge; they would quickly degrade and fail.
Deep-Cycle Battery Importance in Travel Trailers
Deep-cycle batteries are specifically engineered to provide a steady stream of power over a longer period. This sustained power delivery is crucial for running various appliances and systems within a travel trailer, which often operate for extended durations during camping trips. Using a starting battery for these purposes would lead to premature failure due to the constant deep discharge cycles.
Deep-cycle batteries are built to withstand this type of use, maintaining their capacity over numerous charge-discharge cycles.
Battery Switch and Efficient Deep-Cycle Battery Use
The battery switch acts as a central control point, allowing you to isolate the house batteries (deep-cycle) from the vehicle’s starting battery (if applicable) and to select different power sources. This prevents accidental draining of your deep-cycle batteries by the vehicle’s starting system. It also enables you to connect to shore power (hooking up to an external power source at a campground) to charge the batteries without interfering with other systems.
By selectively engaging and disengaging circuits through the switch, you maintain control over battery power flow and avoid unintended discharges, which are detrimental to the lifespan of deep-cycle batteries.
Extending Deep-Cycle Battery Lifespan
Several practices contribute to maximizing the lifespan of your deep-cycle batteries. Regularly checking the battery voltage with a multimeter helps monitor their health and identify any potential issues early on. Avoiding complete discharges, aiming for at least 50% charge remaining, is crucial. This reduces the strain on the battery and prevents sulfation, a common cause of premature battery failure.
Properly charging the batteries after each use is essential, using a suitable multi-stage charger for optimal performance. Finally, keeping the battery terminals clean and free of corrosion ensures efficient power transfer.
Correctly Wired Deep-Cycle Battery System
Imagine a diagram showing two deep-cycle batteries connected in parallel (positive terminals connected together, and negative terminals connected together). From the positive terminal of this parallel connection, a heavy-gauge wire runs to the input terminal of a battery switch. Similarly, a heavy-gauge wire connects from the negative terminal of the parallel battery connection to the output terminal of the battery switch.
From the output terminals of the battery switch, heavier-gauge wires run to the various loads (lights, appliances) within the travel trailer. A separate wire connects the battery switch to the charging source (shore power or alternator). This configuration ensures efficient power distribution and control, allowing for safe and effective use of the deep-cycle batteries.
Mastering your travel trailer’s battery switch is about more than just flipping a switch; it’s about understanding your RV’s electrical system and ensuring reliable power for your adventures. By understanding the different types of switches, practicing safe handling, and knowing how to troubleshoot common problems, you’ll be prepared for anything the road throws your way. Happy travels!
FAQ Corner
What happens if I leave my battery switch in the “on” position while not using the trailer?
Leaving the switch on can lead to a drained battery due to parasitic drain from small appliances or electronics still drawing power.
How often should I check my battery connections for corrosion?
Inspect your connections at least every three months, or more frequently in humid climates. Clean any corrosion immediately.
Can I use a car battery in my travel trailer?
No, car batteries aren’t designed for deep-cycle use and will likely fail quickly. Use a deep-cycle marine or RV battery.
My battery switch is stuck. What should I do?
Try lubricating the switch mechanism with a penetrating lubricant. If that doesn’t work, you may need to replace the switch.
